Tuesday 31 January 2012

The Romans - A Hail Caesar Project - Part 10

A mere 13 days later and once more I return to news about the Romans, and its good news, if you’re a Roman.  Firstly for those out there with a fiery hatred of dwarfs I have to bring sad news that they never made it as far as the battlefield for their encounter with my troll.  Instead a couple of battles of the War of Spanish Succession (Black powder - Argument of Kings rules, Aidans models) took place, and my side lost both miserably.

Back to something of importance, and if you’ve been following the work at progress reports you need your priorities examining.  But you would also have known that I was working on two command groups/bases for the legionary cohorts missing them, and the two command groups/bases for the two auxiliary cohorts.  Added to this list was a base of auxiliaries, a second base of auxiliaries that simply needed dipping etc, and finally I had a bash at a small unit (8 models individually based) of slingers, and a Tribune to command the bally lot. 

The slingers were actually the easiest to paint, having asked for, and following (unusually) the wife’s suggestion that they should stick with brown tunics rather than trying to get a decent red on them.  I’m rather pleased with the effect, and the wife is now insufferable about the decision making process.

The rest followed previous models colour schemes and were more about finishing units that anything exciting.  The Tribune looks quite good after I plumbed for a few bright colours.  All this means my painted total/percentage/whatever looks quite good:

Number of models in the army: 170 (bolt throwers count as 3, cavalry as one per model)
Painted: 105

In fact, who am I kidding, that is actually astounding for me, and added to my ECW troops that brings my painted models total to 180 since the beginning of October 2011.  The previous two years have seen a maximum of 5 models finished, and even in my heyday of racing through FOW or Imperial Guard figures I didn’t come close that that figure, so overall its happy, happy, happy and backslapping all round (tricky to slap your own back, but I had a shot).

Time for some pictures (army sponsored by Farleys Rusks, slingers sponsored by tesco cornflakes.  Table cloth by Debenhams, table by ‘bloke I met down the pub‘).


The last image is of the troops still to do, and given my positive feeling towards the slingers, and fear of death by boredom painting either the 1st Cohort of Legionaries (24 men) or the cavalry, I’ve decided to complete the remaining 16 slingers, a bolt thrower and the tribune on horse back (brown).  This will give me the bulk of the army, with a division of 4 legionary cohorts and a bolt thrower, and one of the two auxiliary cohorts and the three small slinger units, with an officer for each division.  I’ll leave you with the gem that although my computer can recognise the words ‘slingers’ and ‘swingers’ and ‘swinger’, apparently ‘slinger’ does not exist.

Friday 27 January 2012

Work in progress....

Update on the bits I've been working on, and given the recent arrival of the rest of my planned roman army unsurprisingly their all romans!

Having spent a number of evenings painting (the bits between 8:30-9pm, and 10-10:30pm, major lack of spare time!) I have just finished the batch I was working on, and they all stand ready to be 'dipped'.

In order to finish off the cohorts is already started on I've focused on command bases, with 2 legionary and 2 auxiliary 4by4's painted, as well as an additional two 4by4's of auxiliaries. Once dipped I'll have finished 4 legionary cohorts and 2 auxiliary ones.

As a side line I also painted a unit of 8 renegade miniatures slingers - which were refreshingly easy to do - and capped it off by doing a tribune on foot to provide some command muscle.

After these worthies have been dipped, flocked and spray varnished I'm thinking of either an auxiliary horse squadron, or the 1st cohort of legionaries as the next target.

In other news apparently one of the key sources of traffic to my blog is from Google.no - Google Norway.

Wednesday 25 January 2012

Flames of War - Late War Battle Report Vs. American Para's

Grenadier Kompanie Vs. Yanks 2,500pts

Preamble:
Taking a moment to note down some thoughts about tomorrow evenings battle against the RGMB’s resident American; Luke.  I asked for the late war period, and suggested the sum of 2,500pts which the opposition agreed too, and we’ll roll up a scenario at the start, provided either of us can remember how to play Flames of War!  My last game came at the beginning of October, and was against Laurent’s Panzer armada, scarcely a  useful preparation for fighting what is surely going to be a wall of fearless Yank para’s.  However I think Luke’s last game may be in the even more distant past, and I have reasons for optimism.

Firstly my army:
HQ
Grenadier platoon
Grenadier platoon
Grenadier platoon; white pioneers
HMG platoon
Mortar platoon

Pioneer platoon; double flamethrower and a goliath for fun
AT platoon; 2 x PaK40’s
Heavy AT platoon; 2 x PaK43/41’s (ouch time for heavy tanks!)
AA guns; 2 of.
Heavy AA guns; the infamous FlaK36’s and their extra crew
Heavy Tank Platoon; 2 x Tiger 1E
Artillery; 4 x 10.56cm guns (must upgrade at some point to the proper 15cm heavies!)

This little lot were chosen out of Festung Europe (how I wish I had access to Grey Wolf!), and were actually being prepared to do battle with Red’s Russians before man-flu claimed his freedom.  As such it is designed to fend off either the expected T34 tank wave, or a possible choice of massed Russian infantry.  I decided not to alter it to face the Yanks because I felt it could very much do the job there as well, and given I have a very good idea what will be in the Yanks army, while they can’t predict mine as well, it would have seemed unfair.

The plethora of AT guns (including the massive PaK43/41’s) can churn out a nasty 18 AT12 shots a turn, plus the artillery, and the panzerfausts and plentiful pioneers will ensure any tanks that made it into combat wished they hadn’t!  This style army and tactics worked nicely against Ian and his Panzer company (with additional Tigers) so should have a chance against a possible surprise Sherman wave too.

Against the  expected Para’s the combination of mortars, HMG’s and infantry with rifle/mgs should pin down the foot troops, while the AT guns and Tigers look to eliminate the tank support.  Then the pioneers and my own manoeuvrability, once the enemies vehicles have gone, should enable me to pick a weak point and chip away until it cracks.  Overall I’m happy with it as an army and a plan, most of it is even fully painted!  A further feeling of optimism comes from our last encounter where I was able to pin down and run rings around the Para’s, but didn’t have quite the combination of troops to finish the job.  This time round I have fewer trucks/halftracks and so will move slower, but much more nasty hitting power.

Expectations of the enemy:
Slight feeling of guilt having suggested 2,500pts as a limit, given I can reach that easily while Luke has to include everything in his collection.  However he agreed willingly even when given a chance to reduce to 2,000pts, so perhaps he has a trick up his sleeve.  I’m expecting around 3 platoons of Para’s, the usual engineers and light artillery plus mortars and HMG’s.  Given its late war I think some air power will put in an appearance, along with his Brit allies; heavy AT guns and a small platoon of Cromwells and a Challenger.  Finally those nasty tank destroyers and recon armoured cars should be there.


The Battle:
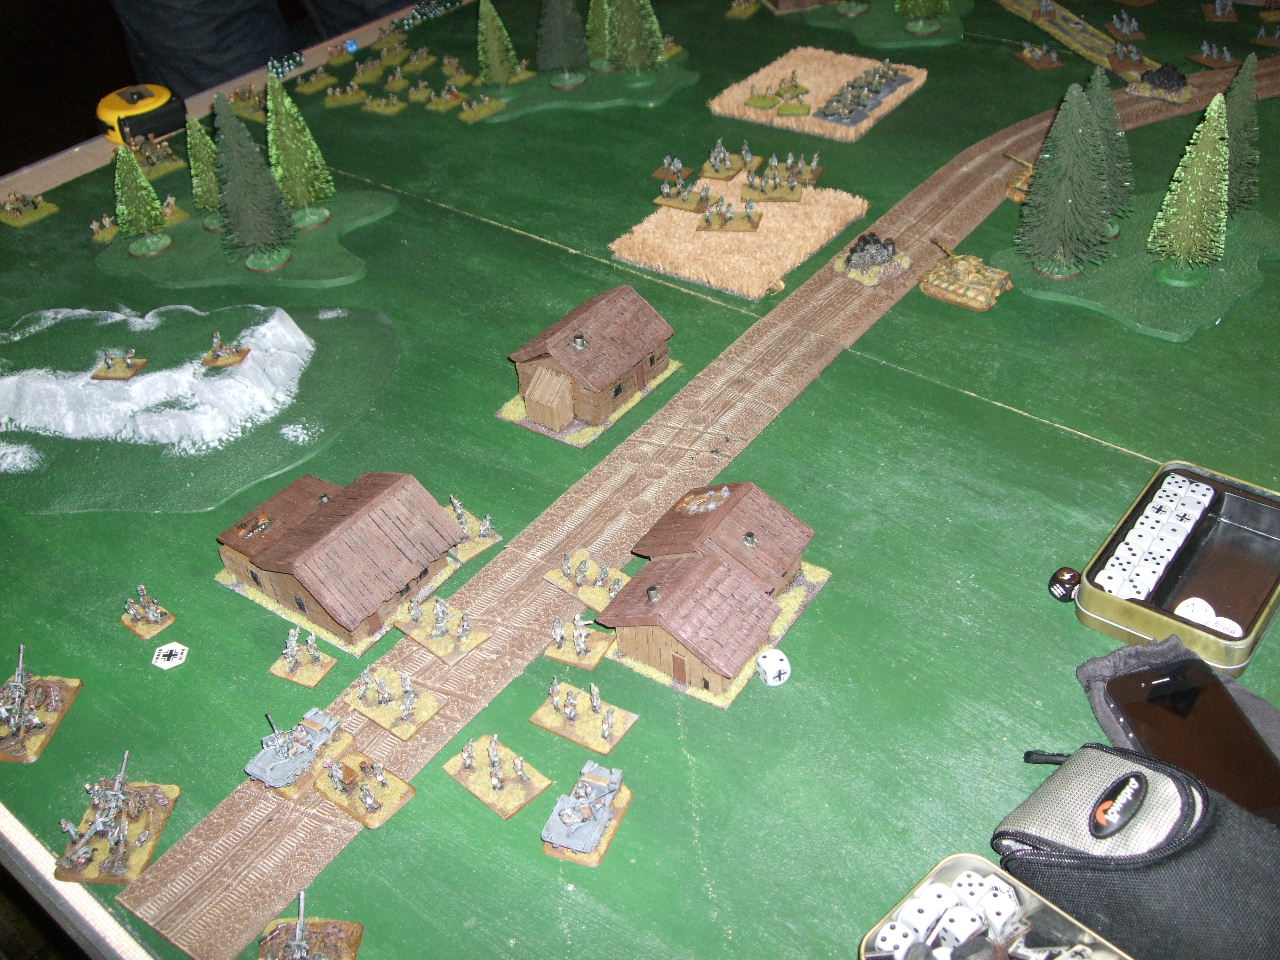
We actually chose a scenario rather than rolling for it.  I’d spotted the road sections in the scenery box, and remembered I’d only ever played the Roadblock scenario once (vs. Red’s Russians years ago) and suggested it.  Given we were both using infantry forces we rolled off for attacker/defender status.  I managed to acquire the title of attacker, which contrary to the image suggested actually meant it was my lot sitting on the road ready to be attacked by Luke’s para’s!  He chose the Tigers as his target for his Ambuscade, and I backed it up with pioneers and white pioneers and off we went.


 Luke sent a bunch of AT guns backed up by bazooka-toting para’s to do the job on the Tigers while the rest of his army got into position.  6 out of his 11 platoons started in reserve, and would be very sluggish turning up.  The Tigers tough armour saved them, and they backed off the road to return fire and await support from the infantry.

 That support was swift in coming, as the two pioneer platoons outflanked and wiped out the guns, while German artillery and troops arrived swiftly on the left flank.  The guns were replaced by a large combat platoon of para’s, and my attempts to use a goliath fell flat once more when a single rifle shot took it out.

 It wasn’t the only piece of good fortune to come the way of the Yanks; their air force having failed to damage the artillery they had more luck strafing the Tigers, before the British heavy guns managed to blow both apart in some spectacular shooting, removing a significant obstacle to the American attack.

More German re-enforcements continued to pour in, with the 88mm FlaK36 guns managing a scorching 32” move down the road!  An interception attempt on them by the Brit heavy guns failed, and both settled down to trade shots across the width of the battlefield.

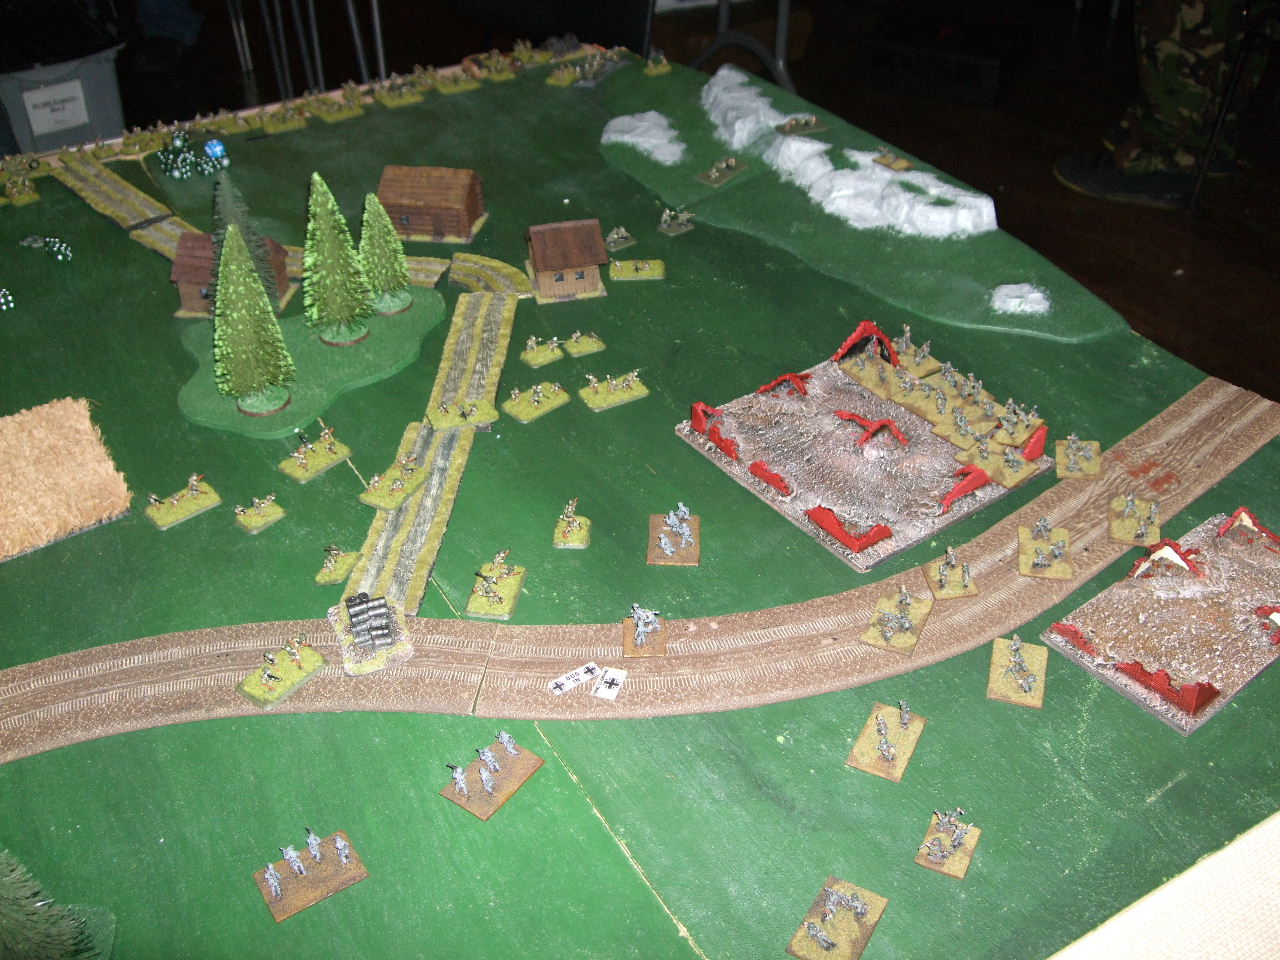
 The American’s allied British tanks arrived as expected, and took a heavy toll on the German artillery, which successfully managed to kill nothing at all for the entire game.  I retaliated by bringing on firstly the PaK40’s, and then the PaK43/41’s to finish the job, which they did nicely.  But the 340ish points of British tanks had cost me 200pts of artillery destroyed, and needed 400pts of AT firepower to destroy them.  Firepower needed elsewhere as the Para’s finally started turning up in numbers and advanced with purpose towards my right flank.


The air force continued to prove a nuisance, destroying one of the 88’s despite the best efforts of my light AA guns.


 On my right my mortars were proving invaluable, decimating the advancing Yanks who had been forced to double in the open.  The HMG’s also arrived, and took up strong firing positions covering the road.  The first para platoon had by now overextended itself, and the pioneers flamethrowers helped wipe them out.

 I lost the PaK43/41’s to some of the newly arrived american artillery, but it was a sideshow to the right flank where the issue was being decided.  The second large para platoon managed to destroy the last of my white pioneers, and effectively destroy my large pioneer unit.  I rushed re-enforcements towards the scene but my right-hand platoon was pinned down by HMG fire.  The para’s own support was also too far away to help, and they stood alone in the last turn as I turned HMG’s, artillery, rifles, AA guns and even an 88mm gun on them!


When the dust settled a last surviving Yank stood by the objective, and my left hand platoon, having travelled nearly the width of the table, had just the movement to assault and wipe them out, ending American hopes.  It was a German victory, but only just.


Analysis:
I liked the scenario, which balanced the Yanks bonus in having a crack at my toughest unit with giving me first turn.  I did feel a bit guilty when my re-enforcements arrived swiftly, while Luke was desperately rolling however!  The Tigers were lucky to survive for a long period, and use of the Brits big guns might have be better than the smaller American ones for the ambuscade.

Interestingly for two armies branded ‘foxhole Normans’ it was an entertaining and manoeuvrable late war game, with only one unit (my pioneers) digging in all battle!  This was attributed to the lack of massed tanks normally encountered which allowed the infantry to get out and fight within fear of being instantly run down in the open.  Luke’s attack was initially stalled as he tried to take out the Tigers to secure an easier way through, and then my mortars proved their worth in wearing down his troops as they headed across the battlefield.

I would like to give the scenario another go, but take the place of the ‘defender’, attacking the road using the same armies.  I think Luke was fully expecting a Panther army to emerge from my carry case (score one to misinformation!), and was almost disappointed it wasn't so, because he felt victory would have been easier to get than against the numerous grenadiers and their anti-personnel weaponry.

Friday 20 January 2012

Work in Progress....

Time for a progress report. Following Christmas, and with the arrival of the rest of my Roman army you would think my painted vs purchased total would look a little sad. However, having finished a second English Civil War foot regiment and artillery piece (which I'm counting as more than one - normally the number of figures on the base), it does look too bad.

Purchased - 89
Finished (since October 2011) - 129

The painting table is now full of Romans, with the ECW troops remaining in the garage for the time being. First up being the command groups for the two legionary and two auxiliary cohorts missing them. I'm also, as a sideline, doing a slinger and a tribune to see how they pan out - unsure whether to go with red of stick with brown as the slingers tunic.

The Napoleonic French had their first outing last week, and they retain their place just in case I get round to painting a couple.

Tuesday 17 January 2012

The Romans - A Hail Caesar Project - Part 9


Roman update time. I first tried posting this using my iphone blogger app, it managed to date it as the 20th of December, no idea why, so I’ve deleted that one, and updated the update here.

Now, remembering the last known situation was that all available Romans had been built and it was simply a case of waiting for Christmas and the new year to acquire more.
Christmas brought most of the needed auxiliary cavalry, my birthday brought the CO (both courtesy of my well informed brother - thank you). Then a moment of exception generosity (possible madness?) from an RGMB club member saw me gain 34 legionaries for free! This was on the single condition that any 1st Cohort I made was not more than 3 ranks deep - a fair demand and one I’ve kept too. Finally in the last few days my order from maestrom arrived with virtually every bit I needed to finish the projected army, and a regiment of Balearic slingers from Renegade turned up.  Both arrived a little earlier than expected, Renegade orders normally take around 15-20 days minimum, but I like the image, quality and price and can be v patient.

All this means that my entire planned army is now in the building, with one exception which I’ll cover in a bit.

The models that are already finished are, of course, already finished, and after some slicing (of finger tips), swearing, sticking and gluing the remainder are all stuck together in their units, and have the layer of sand on their bases - next stop is black spray paint time.  I’ve included a few pictures of the army below, its now in enough pieces to use in a battle.

A recap of the planned army:
General
2 x auxiliary cavalry squadrons (6 models a piece).

Commander
4 x legionary cohorts (16 models a piece).
1 x 1st cohort (24 models).
3 x scorpion bolt throwers

Commander
2 x auxiliary cohorts (16 models a piece).
3 x auxiliary (Balearic) slingers units (8 models a piece).

The only model not stuck to its base is actually the exception; the general, who is the very nice blatant gladiator rip-off on a horse, plus dog.  This is because I looked at him once he arrived and thought he would look very cool with an auxiliary horseman riding alongside.  This model, of course, I haven’t got.  So I’ve put out a ‘feeler’ in the hope of gaining one, until then it may have to be glue-gun time if I need to use him!

Time for a tally:
Number of models in the army: 170 (counting the scorpions as 3 - 2 crew and a bolt thrower).
Number finished: 72

In other good news another kindly soul has handed me the means to afford a few trips to Chester on a Tuesday night for the first time since November - looking forward to it, although tonight’s games will be less historical and more Lord of The Rings, but that’s a system I’ve a soft spot for, even if I have to play those heinous fiends the Dwarfs!


Thursday 12 January 2012

Declaring for the King - Part 2

An update! I've been working on my Kings Lifeguard foot regiment for rather a long time, and following a coat of matt varnish they are joined by my saker battery in being finally finished! I even found a picture on the PC of when I started painting the red in 2009, so this is definately a landmark occasion.

They were being done while I awaited the arrival of the next part of my roman army, and so there may be a fair gap until the next one is finished. Torn between trying a horse regiment or another foot one. No interest artillery left to do sadly.

Sunday 8 January 2012

Work in progress....

Time for an update for the three weevils and a lab rat who are watching. Nothing actually finished, but some progress somewhere.Firstly the royalists, and after their outing last week I've managed to finish painting the Kings Lifeguard, and they are waiting for me to finish the Saker battery (in progress) to do the dip process and finish them off. Hard bits done though. And after this regiment and canon I think I will switch my efforts back to the Romans for a bit.Romans second, and a regiment of balsamic slingers are on order from renegade miniatures (hopefully ill try painting them instead of adding them to the dining table). I've been putting together some of the cavalry tonight, and they are ill fitting buggers! Green stuff on hand, not impressed, they will also be very fragile to use.Finally Napoleonics; I put some paint on 4 15mm men, but not much.

Wednesday 4 January 2012

English Civil War Battle Report

A rare meeting between two old adversaries, and sometime allies; Lord Flasheart & Earl Michael de Blondeville.  Sir Brian Cromwell was expected as well, but he was stuck waiting for traffic to clear on the M56, a long wait when the motorways a few hundred years off being actually built.

In a not particularly revolutionary line of thought we tried out using the Hail Caesar rules for this ECW match-up, with the pike and shotte regiments turning into heavy infantry units (with an additional shooting value of 3 and the Pike rule), and the horse turning into heavy cavalry and the artillery appearing in various categories; light, medium and heavy.  Rather than worry about a scenario as well it was simply a fight until one side quit the battlefield.  Foot regiments numbered 16 men (an 8 and 8 pike/shot split) while horse regiments numbered 4 men.

Having divided up the available models Earl Michael’s forces tended towards the infantry, while Lord Flashearts (mine) had a large cavalry wing.  No big awe inspiring report, just some notes and a few pictures here.


 The Parliamentarians (Earl Michael of course) kicked off by doing exactly nothing, apart from firing a cannon - failed command rolls all round.

 The Royalist centre reacted by steaming forward under the personal command of Lord Flasheart, while Brigadier Wolfe and his horse brigade advanced a bit, then realised that the wall of pikes facing them was a hurdle too high and stopped.

 On the Parlimentarian right their troops garrisoned what might have been a pub, while on their left the single foot regiment clashed with Sir Hugh of Beeston’s brigade, and having broken left the cannon to fend for itself, and the Parlimentarian horse to try and sweep away a bunch of skirmishing musketeers and the Royalist Saker.  Something they failed at constantly due to a stream of ‘6’s to hit causing break tests and retreats.

 In the centre Earl Michael’s own brigade suffered a bit of woe, when firstly one of his foot regiments legged it with only two shots fired (1 causality, 1 break test), then the second and third got involved in a push of pike against Lord Flashearts men and lost spectacularly, fleeing from the field.  With one of three parliamentarian brigades broken, Flashearts men moved on to pressure the remaining regiment and the Parliamentarian right wing.  Brigadier Wolfe tried to get in on the act with a dramatic charge, but messed it up, loosing a regiment and the rest reeled backwards disordered.  Not that the Parliamentarian troops did any better, one foot regiment distinctly hearing the phrase ‘move to your right, off the table’ instead of the actual ‘charge the horse!’  A number of the Royalists were now shaken, but seemed unwilling to quit the field, much to Earl Michaels disgust.

With the Parlimentarian foot penned in, Sir Hugh lead his own pike regiments off to the right, and successfully (and perhaps a bit fortunately) penned in the horse regiments as well.  With volleys coming in and no charge allowed against the wall of pikes it was over as a contest and Earl Michael conceded.


Post Battle Analysis:

With both sides divided into three brigades a series of 1 on 1 clashes looked likely, with Sir Hugh’s Royalist foot getting the better of the Parlimentarian left.  While Wolfes big horse wing did very little due to the limited space to get round the side of the pikes.  In the centre Flashearts troops, with some assistance for Sir Hugh easily crushed Earl Michael’s own brigade, while we worked out how combat worked, and then turned on the outnumbered Parliamentarian right.

In terms of game mechanics I was worried that the break test for being hit by a ranged attack on a 6 would prove too powerful given the musketery on show, but this was groundless.  Only a couple of blunders appeared and it ran much the same as Blackpowder except in the combat stage.  This was simple enough, but the proximity rule bit might prove a bit harder to nail down.

Overall I thought Hail Caesar might be more of an ECW experience than Blackpowder, focusing as it does on close combat rather than shooting.  However, perhaps because we were using an un-adapted set of rules, it still doesn’t have the period taste, and possibly even less than Blackpowder.